If you’re a DIY enthusiast thinking about laying laminate flooring, you’re in the right place for tips and more! This comprehensive guide on how to lay laminate flooring is designed to equip you with the knowledge and confidence to tackle your project like a pro.
Laminate flooring has become a popular choice among homeowners for its affordability, versatility, and the beautiful aesthetic it can bring to any room. But getting it right requires careful planning and execution. We’ll walk you through the essential steps and address common pitfalls to ensure your laminate flooring installation is a success.
If you’re new to laminate flooring and want to explore your options before diving into the fitting process, be sure to check out our Laminate Flooring Buyer’s Guide. So, if you’re ready to transform your living space with a stunning new floor, grab your tools and let’s get started!
Table of contents
- Can you fit laminate flooring yourself?
- How much laminate flooring do I need?
- What tools do you need for a laminate flooring installation?
- Do I need underlay for laminate flooring?
- How do you prepare a floor before laying laminate?
- How to cut laminate flooring
- Where do you start laying laminate flooring?
- How to lay laminate flooring
- How do you lay laminate flooring under skirting boards?
- Installing laminate flooring around radiator pipes
- How to lay laminate flooring around a door frame
- How much will it cost to lay laminate flooring?
- Final thoughts
Can you fit laminate flooring yourself?
Many homeowners often wonder if they can take on the task of laying laminate flooring themselves. The good news is, yes, you can! Laminate flooring is known for its DIY-friendly installation process, making it accessible for those with various skill levels. Without further ado, let’s get started on your laminate floor laying project. (Fasten your seatbelt and deep breath moment.)

How much laminate flooring do I need?
Before you begin your laminate floor project, you’ll need to determine how much flooring you require. This step is essential to avoid purchasing too much or too little laminate. Fortunately, we have a detailed article on how to measure for laminate flooring. Check out our Help and Advice Guide on How to Measure a Floor for a step-by-step walkthrough.
Measuring your floor will involve calculating the total square metres of the area you plan to cover. Once you have these measurements, you can confidently select the right amount of laminate flooring. Remember, it’s a good practice to purchase a bit extra to account for any mistakes or future repairs.

By following our measuring guide and accurately assessing your flooring needs, you’ll not only save money but also ensure a seamless laminate floor installation. Now, with your measurements in hand, you’re ready to move on to the next steps of the installation process.
What tools do you need for a laminate flooring installation?
Once you’ve carefully selected your laminate flooring based on your style and budget, we’re sure you’ll be excited to get going. Having the right tools ready before you start will make your laminate floor installation smoother and more efficient. Here’s a quick overview of the essentials you’ll need to ensure a successful installation:
Tape Measure
Accurate measurements are key to a precise installation. A quality tape measure will be your best friend throughout the process. A pencil will be useful for making notes and marking the boards for precise cuts.
Spacers
These small but mighty accessories help maintain the necessary expansion gap between the flooring and the wall, ensuring your floor doesn’t buckle over time.
Saw
A table saw, circular saw or a jigsaw with a laminate-specific blade will be essential for cutting the laminate planks to fit your room’s dimensions. A hand saw might also do the trick if you can confidently cut your flooring. You’ll also need a Stanley knife to cut your underlay.
Workbench and Clamps
Clamps will help keep your laminate planks securely in place when you’re trying to cut them, while a workbench will provide a stable surface.
Mitre Box
A mitre box is essential for making precise angled cuts, especially when dealing with corners and transitions. You’ll need your hand saw for these cuts.
Pry Bar and Pull Bar
These tools assist in fitting and aligning the laminate planks, especially along edges and in tight spots.
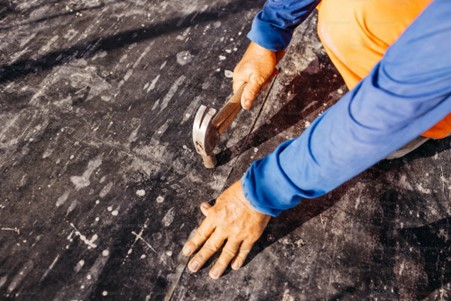
Mallet or Hammer and Tapping Block
These are used to gently tap the planks into place, ensuring they interlock securely.
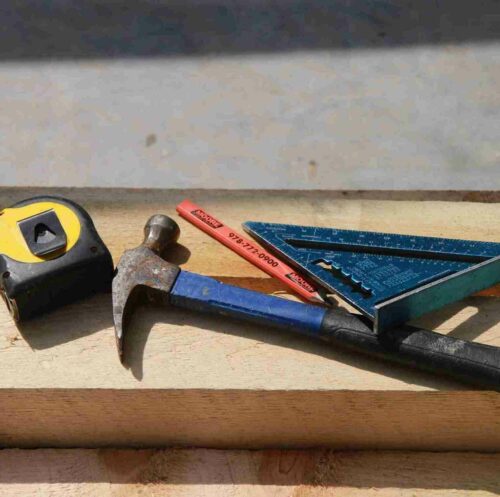
Spirit Level
Not only will this help you check to see if your floor is level, but it will also double up as a straight edge for you to mark where you’ll be cutting.
Combination Square
This tool will help you make precise right-angle cuts and measurements, ensuring a neat and accurate installation.
Chisel
A chisel is handy for trimming and adjusting the laminate planks in tight spaces and around door frames.
Hand-Held Drill with a Spade Bit
You’ll need this for drilling holes to accommodate pipes or other obstacles that may be in your flooring area.
Safety Gear
Don’t forget safety glasses and knee pads for your comfort and protection during the installation process. You might also want ear defenders or plugs to protect your ears from loud machinery and a dust mask to protect your lungs from dust particles.
Do I need underlay for laminate flooring?
When it comes to a successful laminate flooring installation, one thing is certain: you need underlayment. Underlay is a vital component that should not be overlooked.
Underlay serves several purposes, including providing cushioning underfoot, reducing noise and acting as a moisture barrier. It can also help smooth out minor imperfections in the subfloor.
To determine what type of underlay you require for your laminate flooring, consider factors such as the type of subfloor you have, the level of foot traffic in the room and your desired level of comfort and sound reduction.
If your subfloor is wooden, fibreboard underlay is an excellent choice. On the other hand, concrete subfloors will require an underlay with an integrated damp-proof membrane, such as foam, or a separate damp-proof layer if you go for fibreboard.
By including underlay in your installation, you’re not just enhancing your floor’s durability and comfort but also contributing to a quieter and more enjoyable living space. Now, let’s proceed with the step-by-step process of laying your laminate floor.
How do you prepare a floor before laying laminate?
Proper preparation is the key to a successful laminate flooring installation. You might be surprised to hear but common mistakes when laying laminate flooring often start with floor preparation. Follow these steps to ensure your subfloor is ready:
Step One: Clean and clear
Begin by removing all furniture and any existing flooring materials from the room. A clean, clear workspace will make the installation process smoother.
Step Two: Remove the old floor covering
Make sure you remove any old floor coverings, like carpet or vinyl. Otherwise, you risk compromising the integrity of your new laminate floor. These old coverings can create an irregular surface that leads to an unsightly and uneven laminate installation.
Step Three: Inspect the subfloor
Thoroughly inspect your subfloor for any signs of damage, such as cracks, uneven areas, or protruding nails, ensuring it is clean, dry and level. Repair and level any imperfections as needed to create a smooth, flat surface.
Use your spirit level and tape measure to make sure your floor doesn’t have more than 3mm of humps or dips over a 1m length.
Step Four: Moisture check
Check the moisture level of the subfloor. Laminate flooring is not suitable for areas with excessive moisture. Use a moisture meter to ensure the subfloor is within the recommended range. The moisture levels should be no more than 12% on a Protimeter prong test scale. (Different meters have different scales, so make sure to check to ensure a correct reading.)
Then, check the humidity levels using a hygrometer. These readings should be between 45% and 65% RH (Relative humidity).
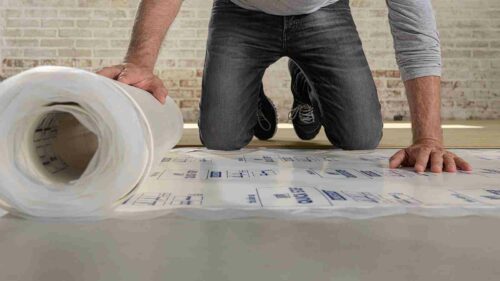
Step Five: Underlay installation
As mentioned earlier, underlay is crucial for your laminate flooring project. Lay the underlayment material according to the manufacturer’s instructions, ensuring it covers the entire floor area.
Roll out the sheets and butt the seams together without overlapping. Secure them in place and tape the edges to prevent moisture infiltration. Some underlays come with adhesive edges that can be used to join the sheets.
Trim the edges to fit against your walls and around any obstructions. You can easily do this with a Stanley knife.
Step Six: Acclimatise the laminate
Allow the laminate flooring planks to acclimate to the room’s temperature and humidity for at least 48 hours. This helps prevent expansion or contraction after installation. However, you should always check the manufacturer’s guidelines, just in case they need to acclimatise for a bit longer.
Leave the packs unopened and lay them flat on the floor to prevent bending. Avoid stacking more than three packs on top of each other, wedging something between them to allow air circulation. (If using underfloor heating, do not stack, full stop.)
Make sure to heat your room as you would for your standard living conditions. Otherwise, your flooring won’t acclimatise properly. Don’t worry if the boards expand or shrink – this is completely normal; they’re just acclimatising to the surrounding humidity and heat.
Step Seven: Plan the layout
Plan the layout of your laminate flooring, considering the room’s dimensions and the locations of doors and transitions. You’ll also want to decide on the orientation of the planks if you haven’t already.
How to cut laminate flooring
Cutting laminate flooring planks accurately is essential to ensure a seamless installation. Here’s a step-by-step guide on how to cut laminate flooring like a professional:
Step One: Measure and mark
Start by measuring the length you need to cut on the laminate plank. Use a pencil to mark the measurement clearly on the plank’s surface.
Step Two: Secure the plank
To prevent splintering and ensure a clean cut, place the laminate plank face down on a stable work surface. Use clamps to secure it in place.
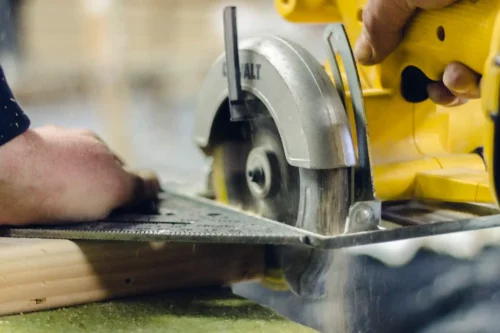
Step Three: Set up your saw
The best way to cut laminate flooring is with a table saw, as it will provide precise and straight cuts for a neat finish. If you’re using a circular saw, adjust the blade to the correct depth, ensuring it cuts through the laminate but not too deeply. For curves or notches, a jigsaw with a fine-tooth laminate blade is your best bet. Fine-tooth blades will provide better cuts and minimise chipping of the surface.
Step Four: Cut along the mark
Carefully guide the saw along the marked line, keeping a steady hand. Go slow and steady to avoid chipping or splintering the laminate surface. Always wear safety glasses during this step.
Step Five: Test the fit
After cutting, test the plank’s fit in its intended location ensuring it fits snugly. If necessary, make any slight adjustments with a file or sandpaper.
Step Six: Repeat as needed
Continue these steps for any additional cuts required to complete your flooring layout. Remember to measure and mark each plank before cutting.
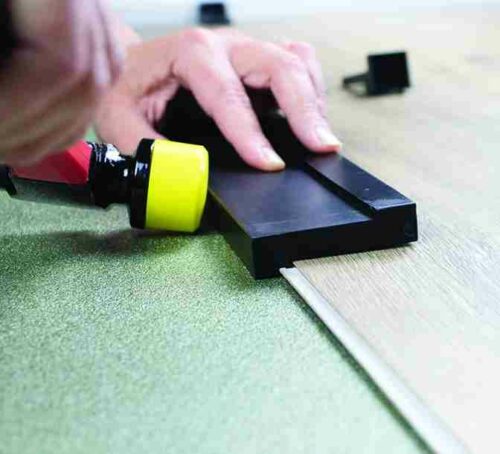
Where do you start laying laminate flooring?
Laying laminate flooring can transform the look of your space, but it’s important to approach the installation process carefully. The starting point for your laminate floor installation is a critical decision. Follow these steps to determine where to begin:
![]()
Step One: Choose the longest wall
In most cases, it’s best to start laying laminate flooring along the longest, straightest wall in the room. This creates a visually appealing layout and minimises the need for excessive cuts.
Step Two: Measure and plan
Measure the width of the room and the width of your laminate planks. Calculate how many rows of planks you’ll need to cover the space. Make sure the final row isn’t too narrow, as it’s important to maintain an aesthetically balanced layout.
Step Three: Establish a starting line
Once you’ve determined your starting wall, use a chalk line or a straightedge to create a perfectly straight reference line parallel to that wall. This line will guide the installation and ensure the first row of planks is aligned correctly.
Step Four: Account for expansion gaps
Remember to leave the recommended expansion gap between the planks and the wall (typically 10-15mm or as specified by the manufacturer). Spacers can help maintain this gap as you work.
How to lay laminate flooring
Now that you’ve established your starting point, you’re ready to begin laying the laminate flooring. Here’s a step-by-step guide to help you achieve a professional-looking laminate floor:
Step One: Install the first row
Begin by laying the first row of laminate planks along the reference line. Place spacers between the planks and the wall to maintain the expansion gap. Make sure the tongue side of the planks faces the wall.
Step Two: Cut planks as needed
Measure and cut the last plank in the first row to fit, ensuring it maintains the expansion gaps. Remember to leave a minimum of 400mm between adjacent end joints in adjacent rows for an authentic, staggered look.
Step Three: Install the next rows
Continue by installing subsequent rows. Interlock the tongue and groove edges of the planks, tapping them gently with a tapping block and mallet to ensure a snug fit. Offset the joints in adjacent rows to create a more stable and visually appealing layout.
Step Four: Cut around obstacles
When you encounter obstacles like door frames, pipes or vents, use a jigsaw, handsaw or hand-held drill with a spade bit to make precise cuts on the laminate planks. (Don’t worry we’ll go into more detail later!). Be sure to leave a small gap around pipes to accommodate expansion.
Step Five: Finish the installation
As you approach the opposite wall, measure and cut the final row of planks to fit. Remember to maintain the expansion gap along the last wall using spacers. Use a pull bar to snugly fit the last row in place.
Step Six: Install transition strips
Install transition bars at doorways and openings to create a seamless transition between rooms with different flooring materials.
Step Seven: Clean and enjoy
Finally, remove the spacers and thoroughly clean your new laminate floor. Vacuum or sweep regularly to keep it looking its best and enjoy the beauty and durability of your newly installed flooring.
By following these detailed steps and maintaining precision throughout the installation process, you’ll achieve a professionally laid laminate floor that enhances the aesthetics of your space.
How do you lay laminate flooring under skirting boards?
When installing laminate flooring, you’ll often encounter the challenge of fitting it under existing skirting boards or baseboards. Have a look at the following steps to help you achieve a seamless finish:

Step One: Use a pry bar
Carefully lift the skirting board using a pry bar or similar tool. This will create enough space to slide the laminate planks underneath.
Step Two: Measure and cut
Once you’ve measured the room and planned the layout of your planks, accounting for expansion gaps, cut your planks as required.
Step Three: Insert the laminate
Slide the cut laminate planks beneath the skirting board and into position. Use a mallet and tapping block to gently tap the planks if needed, ensuring a tight fit. Lay the first row of laminate planks against the wall but leave a small gap between them to accommodate expansion. You can insert spacers to maintain this gap.
If you don’t want to lift your skirting boards, maintain the expansion gap from the skirting boards instead of the wall.
Step Four: Continue installation
Proceed with the installation by laying additional rows of laminate planks, interlocking them as you go.
Step Six: Replace skirting boards
Once the laminate flooring is installed, carefully lower the skirting boards back in place. Use finishing nails or adhesive to secure them in place, taking care not to damage the laminate planks. Ensure they cover the small gap left for expansion and fit snugly against the flooring.
Step Seven: Finish with trim
If you haven’t removed your skirting boards or there are visible gaps between the skirting boards and the laminate, you can use matching floor trim to create a seamless transition, covering the expansion gaps.
You can use a mitre box to make precise 45° cuts at the ends of your trimming, so they neatly join at your corners.
Installing laminate flooring around radiator pipes
When laying laminate flooring, you’ll likely encounter radiator pipes that pass through the floor. To create a neat and professional finish around these pipes, follow these steps:

Step One: Measure and mark
Lay your plank next to the pipe, in the position where it will be laid, and draw a perpendicular line, marking the centre of the pipe. Measure the distance from the edge of the wall (leaving room for the expansion gap) to the centre of the radiator pipe. Transfer this measurement to the plank, marking it with a pencil. The intercepting measurements will indicate where the centre of your hole will be.
Step Two: Cut a hole
Use your hand-held drill with a flat wood drill or spade bit slightly larger than the radiator pipe. Typically, a 32mm size will be sufficient as radiator pipes tend to be 15mm wide. Carefully drill a hole where the pipe will pass through the plank. Be precise to ensure a snug fit.
Step Three: Draw lines
Using your pencil and a straight edge, draw two lines from the widest edges of your hole to the edge of the board. These should be at a slightly outward angle. (Think of those cartoon images of light coming from a torch.)
Step Four: Use a jigsaw
Use a jigsaw to make the necessary cuts along your lines. Take care to follow the marking accurately. Remove the cut wedge piece but save it for later. (Pop it in your pocket or that old shoebox you’ve filled with random bits and bobs).
Step Five: Install the plank
Lay the plank in its intended position, with the hole aligned over the radiation pipe. Ensure the plank is properly interlocking with the adjacent planks.
Step Six: Insert the wedge piece
Remember the wedge piece we told you to save? You can now put it back where it came from, gluing it in position with grab adhesive. For a clean finish, you could add a pipe surround, which can also be secured with grab adhesive.
Step Five: Continue installation
Proceed with the installation by laying additional rows of laminate planks, interlocking them as you go. Ensure the expansion gap is maintained around the radiator pipe.
How to lay laminate flooring around a door frame
Another challenge you might face when installing laminate flooring is properly fitting it around door frames. This is essential for a polished and seamless appearance. Follow these steps to tackle this aspect of the installation:

Step One: Measure and mark
Measure the space between the outer edge of the door frame on either side. Then, measure the gap between the last installed row of planks and the door. Transfer the measurement to the plank you plan to install, remembering to allow an expansion gap at each end.
Step Two: Cut the plank
Use a laminate cutter or jigsaw to carefully cut the plank along the marked line. Ensure the cut is straight and clean, allowing for the necessary expansion gap.
Step Three: Test fit
Place the cut plank in its intended position, ensuring it fits snugly under the architrave. Make any additional adjustments if necessary, marking where you need to trim the ends for a neat finish. (If your boards are vertical, you’ll need to do this for each plank.)
You may find that you need to slide a single row or a few rows back to make room for the door piece. Once it slides under the architrave, you can continue your installation as normal.
Step Four: Marking the architrave
If there’s no space under the architrave, you’ll need to use a chisel to create the necessary clearance for the laminate plank. Begin by marking the area on the architrave where the laminate plank needs to fit, making sure your measurements are accurate.
Step Five: Chisel carefully
Then, take a sharp chisel and position it on the marked area. Use a hammer to gently tap the chisel, gradually removing small sections of the architrave. Be patient and precise during this process to avoid damage.
Alternatively, you could use a jigsaw with a fine-toothed blade to cut the architrave. This provides a more rapid cutting action compared to chiselling and is suitable for straight cuts. On the other hand, an oscillating multi-tool equipped with a wood-cutting blade allows for controlled and precise cuts in tight spaces.
Step Six: Test the fit
Periodically test the fit of the laminate plank you chisel. Continue chiselling until the plank can slide comfortably under the architrave while maintaining a snug fit.
Step Seven: Smooth the edges
Once you’ve achieved the desired fit, use sandpaper to smooth the edges and create a neat finish.
Step Eight: Clean up
Remove any wood shavings or debris from the area to ensure a clean installation.
Step Nine: Adding a threshold bar
If you want your laminate flooring to transition between different rooms or flooring materials with a threshold bar, keep reading this step!
Determine the length needed for the threshold bar to span the doorway. Use a saw to trim it to the correct size. Then, position the bar, ensuring it covers the gap between the laminate flooring and the adjacent floor material. Secure it in place using screws, adhesive or the method recommended by the manufacturer.
Step Ten: Just keep laying
Proceed with the installation by laying the remaining rows of planks. Don’t forget to maintain the expansion gap and use spacers accordingly! (Obviously, we know you’re not Dory, so you don’t have an issue remembering these things!)
How much will it cost to lay laminate flooring?
We’re sure you’re wondering how much all these materials and tools will be. The cost of laying laminate flooring can vary based on several factors, including the size of your space, the quality of laminate you choose, and whether you plan to install it yourself or hire a professional.
Well, if you’ve made it this far, you’ve probably decided to do it yourself, so save yourself from the expense of labour costs! These prices tend to vary by location and complexity. On average, you might expect to pay around £10 to £15 per square metre for installation. Some flooring fitters will charge a standard day rate of between £150 and £200. Keep in mind that this cost will cover both labour and expertise. Plus, if you factor in removing the existing floor, making subfloor repairs, adding underlay and finishing touches, your costs may even double. (Not to mention inflation!)
Here’s a breakdown of the key cost considerations:
Laminate flooring material
The price of laminate flooring can range from £10 to £40 or more per square metre, depending on the quality, design, and brand you choose. Entry-level laminates tend to be on the lower end of this range, while premium options are priced higher. You can calculate the cost based on the total square metres you plan to cover.

Underlay
Underlay is crucial for a successful installation and typically costs around £2 to £6 per square metre. Be sure to calculate the underlayment cost based on your total square metres.
Additional materials
You may need additional materials like threshold bars, adhesives or screws. These costs can vary, so budget accordingly.
Tools
If you don’t already have the necessary tools for installation, (for example, saws, spacers, tapping block), you’ll need to purchase them. Tool costs can vary, and it’s a one-time expense. If you need everything and are starting from scratch, you’ll likely need to spend upwards of £450. Thankfully, we have a Flooring Installation Kit, which includes spacers, a tapping block, a pull bar and a mallet, so you don’t have to search far for a few of the essentials.
Extra fees
Don’t forget to factor in any delivery fees when purchasing materials.
By considering these cost factors and planning your budget carefully, you can ensure your laminate flooring project stays within your financial means.
Final thoughts
Embarking on a DIY journey to lay laminate flooring can be an exciting and rewarding project. Laminate flooring offers affordability, versatility and aesthetic appeal to enhance any room. As you dive into this endeavour, keep in mind that proper planning and attention to detail are essential for success. Our comprehensive guide has equipped you with the knowledge and confidence needed to tackle this project like a professional. With your dedication, you’ll transform your living space with a stunning new floor that reflects your personality and style. Happy flooring!

Was this guide useful?
Mentioned in this project guide:


